VMware Workstation: un trucchetto per ottimizzare le VM Windows

E’ normale, per me, lavorare con virtual machine contemporaneamente attive sulla mia workstation selfmade, con processore Intel Core i7-2600, 16 GB di ram e svariati TB di disco: pur avendo a disposizione hardware di tutto rispetto, è fondamentale ottimizzare periodicamente le VM per tenerle in buona efficienza ed evitare problemi di performance.

Uno dei problemi più comuni derivato dall’uso di VM che porta a problemi di performance è la frammentazione dei file container che ospitano il file system della VM, siano essi VMDK, VHD, qcow o VDI: prima di deframmentare questi file è prima necessario riorganizzare i dati del disco all’interno della VM seguendo queste linee guida:

  • eseguire la “Pulitura disco”, svuotare il cestino, cancellare i file temporanei;
  • deframmentare il disco: io uso UltraDefrag in modalità “Full optimization” per consolidare i dati;
  • eseguire il tool “sdelete” con opzione “-z” di Windows Sysinternals per cancellare (tecnicamente “scrivere tutti 0”) completamente il contenuto dei cluster marcati come inutilizzati (cioè lo spazio libero su disco);

A questo punto è possibile spegnere la VM ed eseguire la compattazione e la deframmentazione dei file container: in VMware Workstation è possibile farlo dai “Settings” della VM, “Hard disk”, “Utilities”.


Windows7: come ottimizzare le performance del file sharing di SMB

Windows7 può essere usato, in una LAN casalinga o in un piccolo ufficio, anche come file server offrendo buone prestazione: è tuttavia possibile ottimizzare e migliorare le performance di SMB per l’utilizzo specifico come file server, a patto di “consumare” un po’ più memoria RAM.
L’impostazione di default del sottosistema server di SMB, infatti, non prevede l’utilizzo di caching per i file e minimizza l’utilizzo della memoria dedicata al file sharing.

Per attivare il caching dei file è sufficiente editare il parametro di registry:

HKLMSYSTEMCurrentControlSetControlSession ManagerMemoryManagementLargeSystemCache

e settare LargeSystemCache a valore “1“.

Per allocare un maggiore quantitativo di memoria per il file sharing è inoltre necessario editare il paramentro di registry:

HKLMSYSTEMCurrentControlSetServicesLanmanServerParametersSize

e settare Size a valore “3“.


Crysis: come risolvere l’errore “5024” all’avvio del gioco

Sto approfittando della Summer Sale su Steam per fare incetta di tutti quei giochi che non ho avuto l’occasione di giocare prima.
Tra questi ho comprato il pack contenente tutti gli episodi della serie “Crysis” della Crytek e mi sono messo subito a scaricarlo, ansioso di giocarci.
Avvio il gioco e… BAM il gioco non parte!
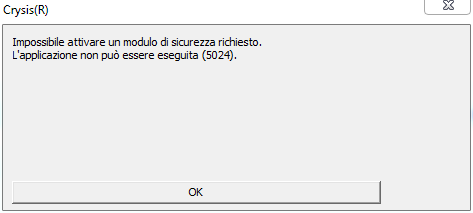
Appare infatti la finestra di errore che segnala “Impossibile attivare un modulo di sicurezza richiesto. L’applicazione non può essere eseguita (5024)” ed il gioco non parte neanche a manovella.
crysis_5024

Che fare??
La soluzione è piuttosto sconcertante: l’errore è causato dalla presenza in esecuzione del programma “Process Explorer” di Microsoft Windows Sysinternals.
Probabilmente a Crytek pensano che usare un task manager alternativo, peraltro perfettamente legittimo e prodotto da Microsoft, possa voler dire essere cheater o, peggio, pirati?
Bah, la trovo una cosa stupida!

E’ sufficiente chiudere Process Explorer e rilanciare il gioco per poter iniziare finalmente a giocare.

Google puts Flash plugin in a more secure browser sandbox (via ZDNet)

Google puts Flash plugin in a more secure browser sandbox

As proven by the CanSecWest Pwn2Own hacks, the Flash Player plugin that ships with Google Chrome is a major weak spot that has been targeted by attackers. 

Not anymore.

Google has quietly tweaked the browser to put Flash in the browser’s more restrictive sandbox on all versions of Windows, making it significantly harder to exploit a Flash Player vulnerability to get full system access.

The fully sandboxed Flash was included in the Chrome 21 beta release, according to Google’s Justin Schuh.

Windows7 e Server 2008: gestire da riga di comando gli event log di Windows con “Wevtutil.exe”

Wevtutil.exe è un comodo programma a riga di comando, presente su Windows7 e Windows Server 2008, che permette di gestire, anche remotamente, gli event log di Windows: è possibile infatti eseguire query, vedere e modificare le configurazioni dei log, esportarli in vari formati per poterli archiviare.
Alcuni esempi pratici:

Lista degli event log presenti sul computer:
wevtutil el

Visualizzare i parametri di configurazione del system event log da un computer remoto:
wevtutil gl System /r:nome_computer

Visualizzare informazioni aggiuntive (dimensione, numero di entry, data di creazione) dell’application event log da un computer remoto:
wevtutil gli Application /r:nome_computer

Visualizzare, in formato testo, i 100 record più recenti dell’application event log da un computer remoto:
wevtutil qe Application /c:100 /rd:true /f:text /r:nome_computer

Esportare su file il System event log da un computer remoto (il file verrà creato sul computer remoto):
wevtutil epl System C:backupsystem.evtx /r:nome_computer

Esportare su file e cancellare tutti i record dell’Application event log da un computer remoto (il file verrà creato sul computer remoto):
wevtutil cl Application /bu:C:zapplication.evtx /r:nome_computer


A questa pagina http://technet.microsoft.com/en-us/library/cc732848%28v=ws.10%29.aspx troverete la spiegazione di tutte le opzioni e degli switch di esecuzione di Wevtutil.exe.

Windows7: Apple Bonjour, errore “Failed to connect to a windows service” e Winsock da buttare

Ho da poco avuto un problema, sul mio portatile con Windows7 x64, che mi ha fatto venire un bel mal di testa per cercare di risolverlo.
Tutto è iniziato quando ho deciso di disinstallare iTunes e tutti i programmi Apple ad esso collegati: dopo la disinstallazione del servizio “Bonjour“, al successivo riavvio, il portatile non è stato più in grado di collegarsi alla rete aziendale (sia wired sia wireless), a quella casalinga e ad internet.

L’event log di sistema era pieno di questi errori:
Failed to connect to a windows service. Windows could not connect to the System Event Notification Service service. This problem prevents limited users from logging on to the system. As an administrative user, you can review the System Event Log for details about why the service didn’t respond.
Per qualche oscuro motivo la disinstallazione di Bonjour non è avvenuta in maniera corretta, e TCP/IP e Winsock sono rimasti corrotti.

In Windows7 è possibile ripristinare parametri e servizi di TCP/IP e winsock da riga di comando eseguendo:
netsh winsock reset
netsh int ip reset

All’esecuzione di questi comandi, tuttavia, il sistema ha riportato l’errore:
Initialization Function InitHelperDll in NSHHTTP.DLL failed to start with error code 11003
ed al successivo riavvio la rete non era ancora disponibile.

L’unico modo per fare tornare a funzionare tutto è stato piuttosto da brividi: ho dovuto cancellare le chiavi di registry relative a TCP/IP e Winsock, esportarle e ripristinarle da un altro computer simile funzionante, resettare TCP/IP e Winsock con netsh.
Quindi ho dovuto:

  1. cancellare la chiave HKLM/System/CurrentControlSet/Services/Winsock
  2. cancellare la chiave HKLM/System/CurrentControlSet/Services/Winsock2
  3. esportare in un file .reg, da un computer funzionante, la chiave HKLM/System/CurrentControlSet/Services/Winsock
  4. esportare in un file .reg, da un computer funzionante, la chiave HKLM/System/CurrentControlSet/Services/Winsock2
  5. importare i due file di registry del computer malfunzionante
  6. riavviare
  7. eseguire nuovamente netsh winsock reset e netsh int ip reset
  8. riavviare

ed il computer è tornato online.
GLUB 🙁

W32.Flamer: Enormous Data Collection | Symantec Connect Community

Articolo originale qui: W32.Flamer: Enormous Data Collection | Symantec Connect Community.

Una interessante analisi dei lab Symantec riguardo quali genere di informazioni il virus / worm “Flame” riesca a recuperare e rubare da un computer. E’ importante tenere presente che la stragrande maggioranza dei malware eseguono questo tipo di data harvesting dai computer infetti.
Guardate un po’ cosa rileva:

1_original
2_original
3_original
4_original


Windows Server 2012: SMB 2.2 is now SMB 3.0 (via TechNet Blogs)

Repost via SMB 2.2 is now SMB 3.0 – Windows Server Blog – Site Home – TechNet Blogs.

To summarize, the following are some of the key new functionalities available with Windows Server 2012 SMB 3.0:

SMB for Server Applications – Many of the new SMB features are specifically designed for server applications that store the data on file shares—for example, database applications such as Microsoft SQL Server or virtualization software such as Hyper-V. This allows applications to take advantage of advances in storage management, performance, reliability, and cost efficiency that come with SMB to deliver an application storage solution that rivals traditional Fibre Channel storage solutions in features and capabilities, but remains easier to provision and less expensive to implement.

Active file sharing with SMB Scale Out – Enables customers to scale share bandwidth by adding cluster nodes, as the maximum share bandwidth is the aggregate bandwidth of all file server nodes and not restricted to the bandwidth of a single cluster node as in previous versions. Scale-out file shares also makes it much easier to manage a file server cluster, as it is no longer necessary to create multiple clustered file servers, each with separate cluster disks, to take advantage of all nodes in a cluster. Further, the administrator can transparently redirect SMB client connections to a different file server cluster node to better balance the cluster load.

Scalable, fast, and efficient storage access with SMB Direct – SMB Direct (SMB over Remote Direct Memory Access (RDMA)) is a new transport protocol for SMB in Windows Server 2012. It enables direct memory-to-memory data transfers between servers, with minimal CPU utilization and low latency, using standard RDMA-capable network adapters (iWARP, InfiniBand, and RoCE). Any application which accesses files over SMB can transparently benefit from SMB Direct. Minimizing the CPU cost of file I/O means application servers can handle larger compute workloads with the saved CPU cycles (for example, Hyper-V can host more virtual machines).

Fast data transfers and network fault tolerance with SMB Multichannel – Given that customers can now store server application data on remote SMB file shares, SMB was enhanced to improve network performance and reliability. SMB Multichannel takes advantage of multiple network interfaces to provide both high performance through bandwidth aggregation, and network fault tolerance through the use of multiple network paths to data on an SMB share.

Transparent Failover and node fault tolerance with SMB – Supporting business critical server application workloads requires the connection to the storage back end to be continuously available. The new SMB server and client cooperate to make failover of file server cluster nodes transparent to applications, for all file operations, and for both planned cluster resource moves and unplanned node failures.

VSS for SMB file shares – VSS for SMB file shares extends the Windows Volume ShadowCopy Service infrastructure to enable application-consistent shadow copies of server application data stored on SMB file shares, for backup and restore purposes. In addition, VSS for SMB file shares enables backup applications to read the backup data directly from a shadow copy file share rather than involving the application server in the data transfer. Because this feature leverages the existing VSS infrastructure, it is easy to integrate with existing VSS-aware backup software and VSS-aware applications like Hyper-V.

Secure data transfer with SMB encryption – SMB Encryption protects data in-flight from eavesdropping and tampering attacks. Deployment is as simple as checking a box, with no additional setup requirements. This becomes more critical as mobile workers access data in centralized remote locations from unsecured networks. SMB Encryption is beneficial even within a secured corporate network if the data being accessed is sensitive..

Faster access to documents over high latency networks with SMB Directory Leasing – SMB Directory Leasing reduces the latency seen by branch office users accessing files over high latency WAN networks. This is accomplished by enabling the client to cache directory and file meta-data in a consistent manner for longer periods, thereby reducing the associated round-trips to fetch the metadata from the server. This results in faster application response times for branch office users

SMB Ecosystem – A critical aspect of Windows Server 2012 development is the partnership we have established with vendors to ship SMB 3.0 capable systems. We have been working closely with several server vendors and open source partners over the past year, by proactively providing extensive protocol documentation and numerous open “plugfest” events provide opportunities for test and feedback. Finally, and most importantly, the SMB ecosystem now reaches all the way to key server applications such as SQL Server and Hyper-V to ensure that SMB 3.0 capabilities are fully leveraged all the way through the stack, and across the multivendor network.
McAfee VirusScan Enterprise: Come ripristinare un file quarantinato

Spesso mi è capitato di dover recuperare dai computer di amici, parenti o colleghi sample di virus.
Oggi, invece, mi è capitato di dovere recuperare alcuni file legittimi messi in quarantena “per errore” dall’antivirus: mi è capitato, infatti, di dover ripristinare alcuni script VBS (da me creati) che McAfee VirusScan Enterprise 8.7 rilevava come pericolosi.
“Quale è la difficoltà?” vi chiederete voi: ebbene, i file non erano più presenti nella Quarantine Manager, ma solo nella cartella “Quarantine” sul disco fisso sotto forma di file con estensione BUP.
In aggiunta: i file che vengono quarantinati (i BUP) vengono anche crittografati.

Dopo alcuni momenti di disperazione nera, ho cercato in internet e sono riuscito a trovare, per mia fortuna, questo articolo sulla knowledge base di McAfee: How to restore a quarantined file not listed in the VSE Quarantine Manager.

Praticamente i file BUP sono archivi che contengono un file descrittivo dell’evento e del virus (file details) ed il file originale, cui è stato applicato un banale XOR con valore esadecimale 0x6a.
Con un apposito tool è possibile fare la reverse e recuperare il file.

PHEWWWW 😀